


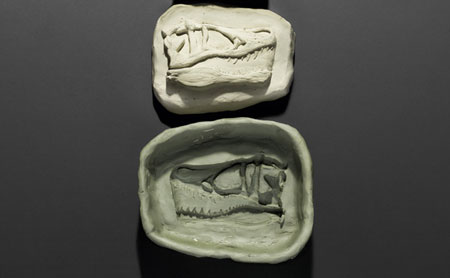
Mold a Dino Fossil
By Adam Savage | 05.16.12 6:11 PM
Making plaster casts is a good exercise: You have to think upside down and backward. One of my sons made a “space remote”; the other made a fish.
Materials:
Work surface, like a piece of plywood
Clay
Rolling pin
1-pint mixing cup
Plaster of paris
Procedure:
Roll out a piece of clay—I like polymer-based Super-Sculpey—about 8 inches square and of roughly even thickness, about three-quarters of an inch. Once it’s smooth, cut off the edges to make a square. Then carve what you want—or press something, like shells, into the clay.
Once the negative space of your project is complete, it’s time to make it into a mold for the positive-space version: Take more clay and build a half-inch-tall wall around the edge of your piece. The best approach is to shape a long piece of clay into a cylinder, roll it flat, and then press it along the perimeter of your workpiece.
Next, mix the plaster. You can get it at the hardware store or, for a small amount that’s perfect for a project like this, from an art-supply store. Fill the mixing cup about a quarter of the way with water. Start sifting in the powder, letting it settle to the bottom. (Adding powder to water gives you a nice mix.) Keep going until a little island forms on the surface of the water. At first the water will soak it up. When you get to the point where the water can’t soak up the island, you’re very close to the ideal ratio. Add just a tiny bit more plaster (you have a lot of flexibility), then mix thoroughly (it’ll be thinner than you think) and pour it into your mold. It’ll set in about an hour.
Note: If you’re careful and willing to make another retaining wall, you can sometimes get two or three castings. How you finish the plaster piece—leaving it raw or painting it—is up to you.


The Art of Facebook
Facebook's got it all-845 million users, a $100 billion valuation, blackmail-worthy pies of everyone born in the '90s, and a screen-printing studio.Yup, that's right...
Read More >>
The Imagination Engine

When Tim Sweeney is out in the world discussing pedestrian things—the sweet tea at a particular barbecue restaurant, say, or the irony of having a hockey team in...
Read More >>